In Matchwalls the design and manufacture of wallpaper is our passion. The quality of the materials, design and manufacture of our wallpapers helps us create a unique, singular and especially manufactured product for the needs of our professional clients, interior designers, interior designers, architects and particular decoration lovers.
Choose the quality that best suits your project
Not Woven, Vinyl, Metallics or Peel & Stick?
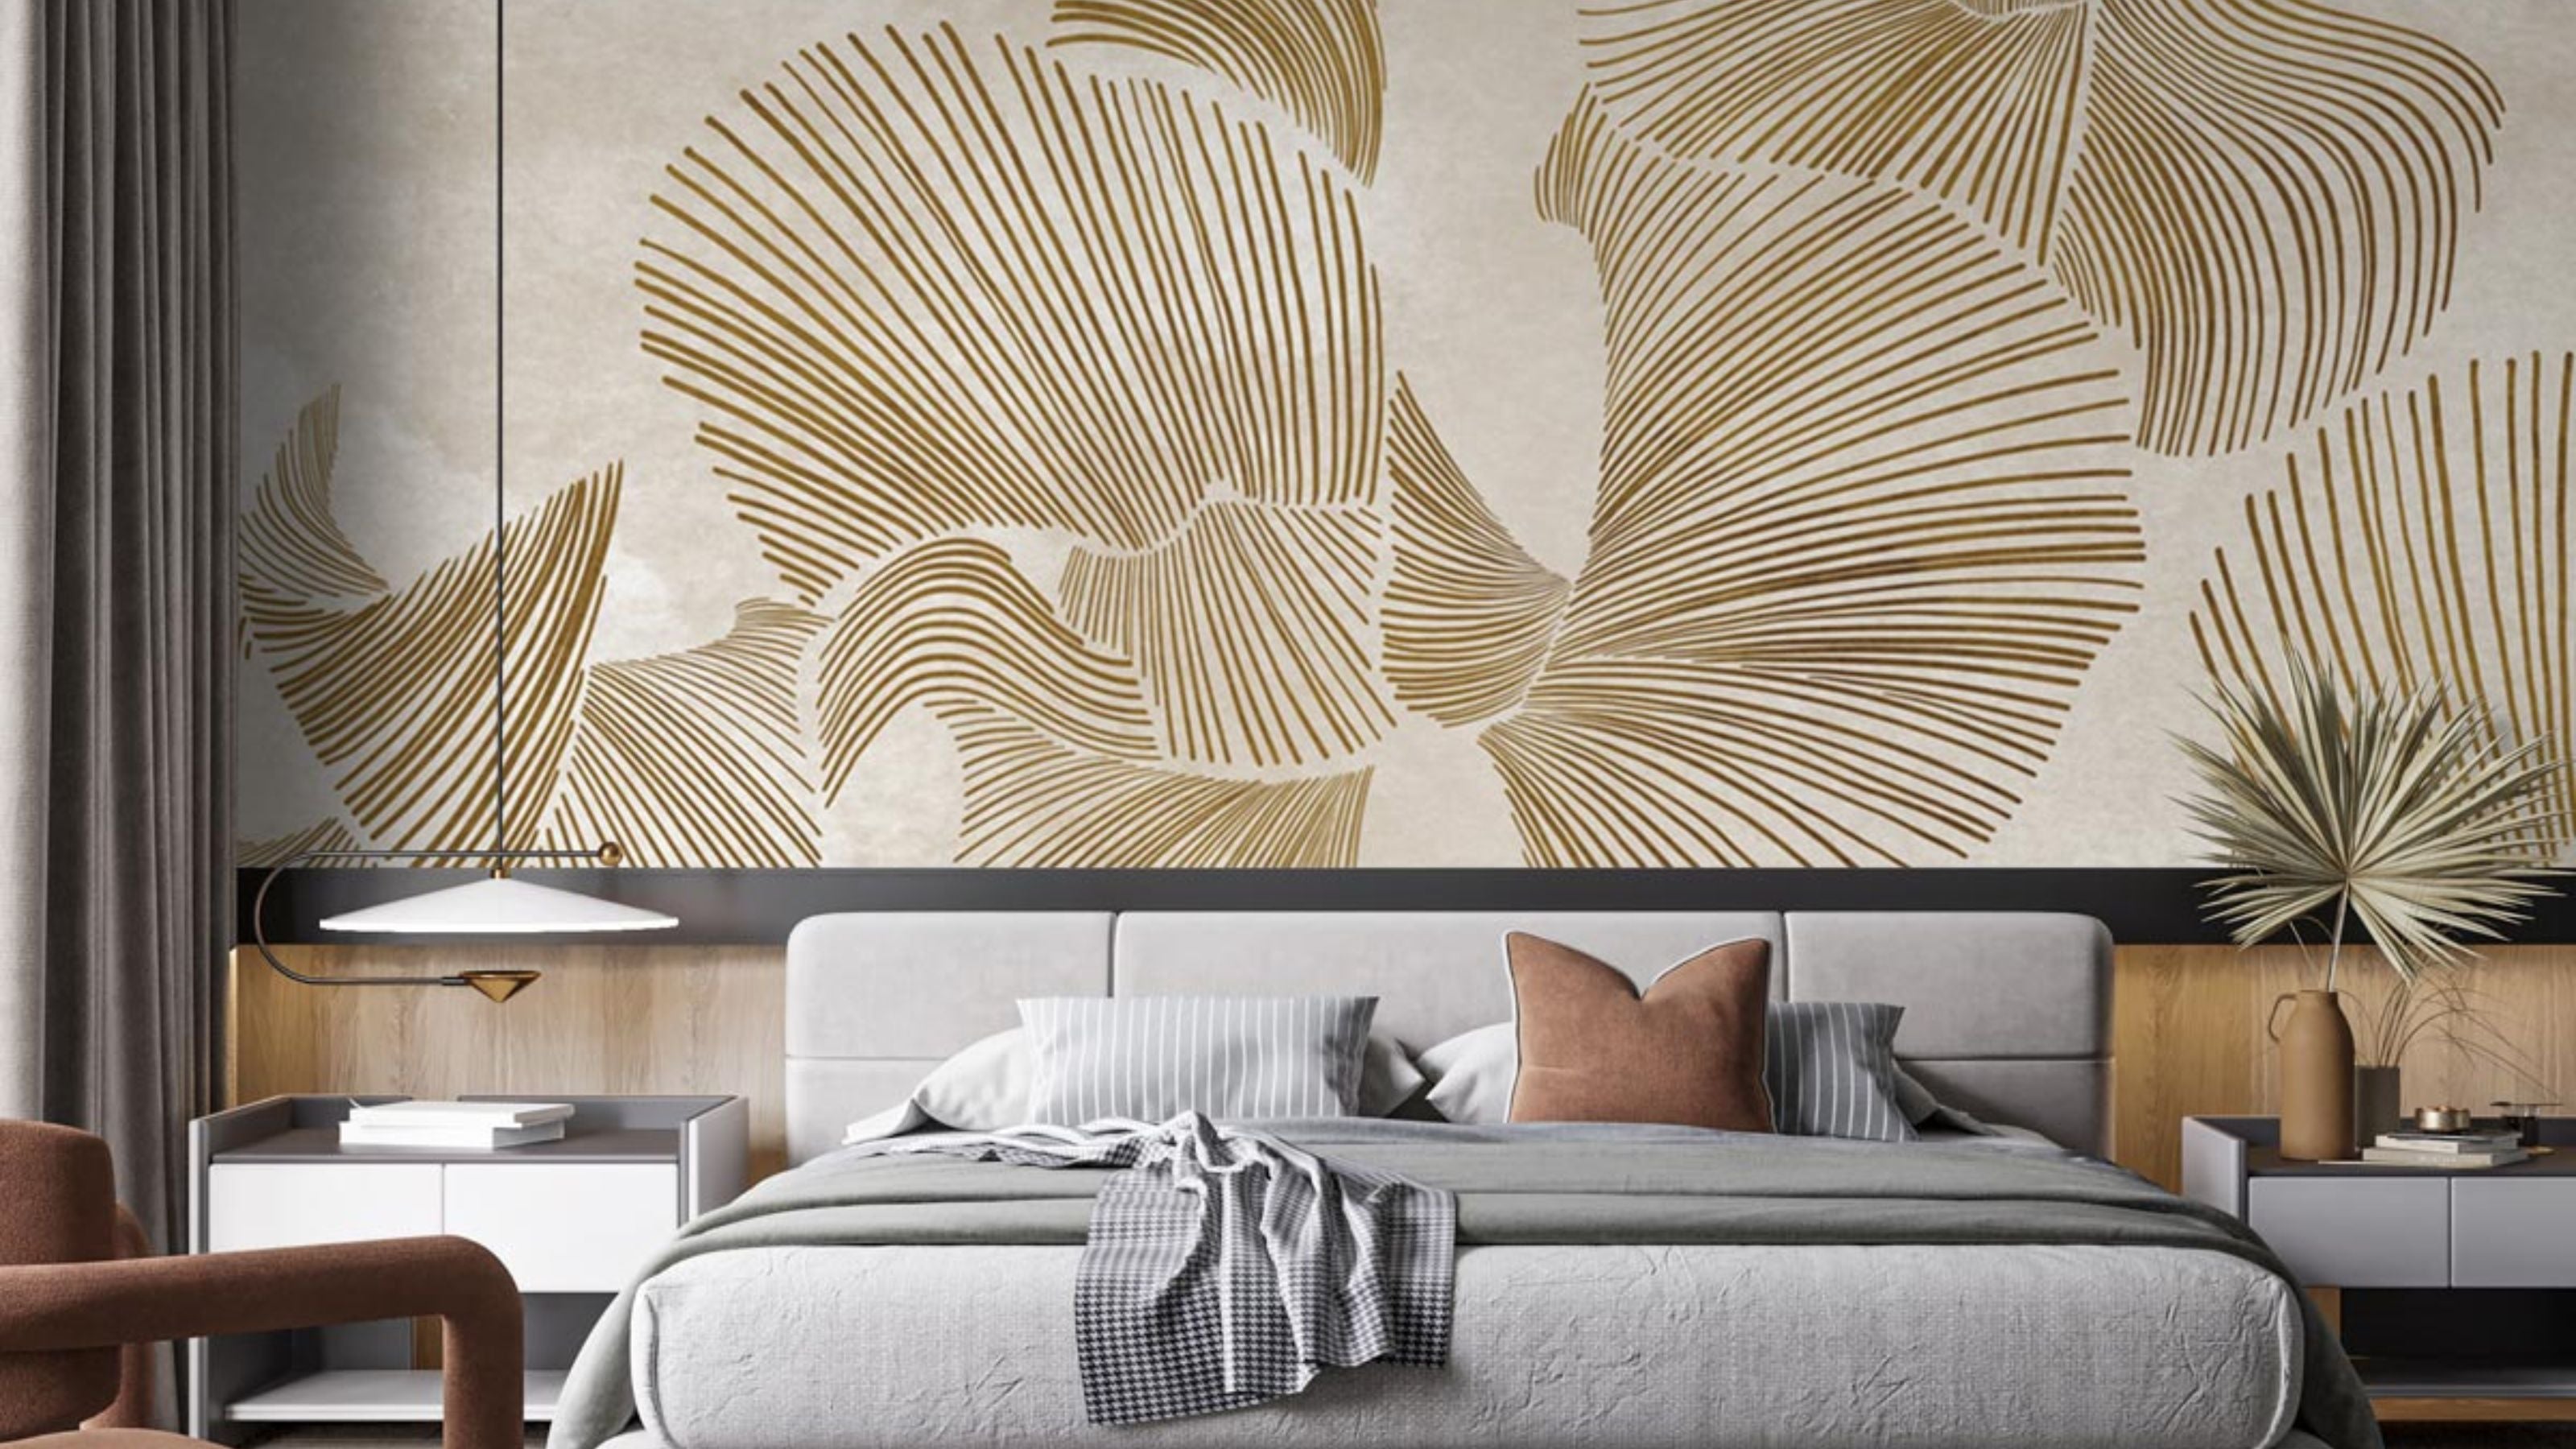
Explore the Wall -paper matchwalls, rolls and custom murals, adapted to the needs of residential or professional facilities, hotel, restaurant or public space that you are designed. Choose between Quality Non Woven, Vinilica, Metal or Peel and Stick, all of them ecological, without PVC and produced with Sustainable manufacturing processes. Non Woven and Metallics offers benefits and certifications Ignipugas, washable and durable, while the vinyl offers greater resistance and ease of cleaning with matte finishes all of them. Peel and Stick It is a perfect solution for private spaces and especially those households in which We have no plan to be a long season. It is ideal for tenants and expatriates who want to give an elegant touch to their home, easily both when settling and by withdrawing the paper.

Non Woven
Non -tissue textile

The glue is applied directly to your wall
Do not fade with sunlight

It is ecological

PVC free

Not flammable

Washable - spongable


Vinyl
Rear and vinyl non -tissue textile at the top
The glue is applied directly to your wall
Do not fade with sunlight
It is ecological
Free volatile substances
Not flammable
Do not scratch and resistance to friction
Matte surface
It does not reflect the light
Washable - spongable with neutral detergent

Pell & Stick
Non -woven textile
Do not fade with sunlight
It is ecological
PVC free
Not flammable
High quality self -adhesive
Installation and disassembly without effort

Satin finish

METALLICS
Non -tissue textile
The glue is applied directly to your wall
Do not fade with sunlight
It is sustainable
PVC free
Not flammable
How to install our Non Woven, Metallic and Vinyl murals?
Easy and simple personalized mural installation of Matchwalls Non Woven, Metal and Vinyl of High Presentations, Resistance and Durability.
Enjoy a wallpaper personalized (murals) and Adapted to your space, with numbered panels to simplify the installation on your murals.
Previous recommendations
Take action
In Matchwalls we print the paper with the exact measure of your wall to fit it perfectly. Even so, not all walls are the same or perfectly straight. Therefore it is important that you measure several sections of your wall. When you make your order, always introduce the longest measure of high and wide. We recommend that you add between 6 and 10 centimeters or 2.5 and 6 more fans that will serve as margin at the time of placement.
Discover our advice on how to take action.
Installation tips
- The discassal paint or anterior loose wallpaper should be removed.
- Use a cube and a mixer to mix.
- We advise specific powder to glue wallpaper for sale in your nearest trade. Sprinkle the content of the package in 4 liters of cold water, mixing vigorously for 30 seconds.
- After approximately 3 minutes stir again.
- After 15 minutes stir again and will be ready to apply on the wall.
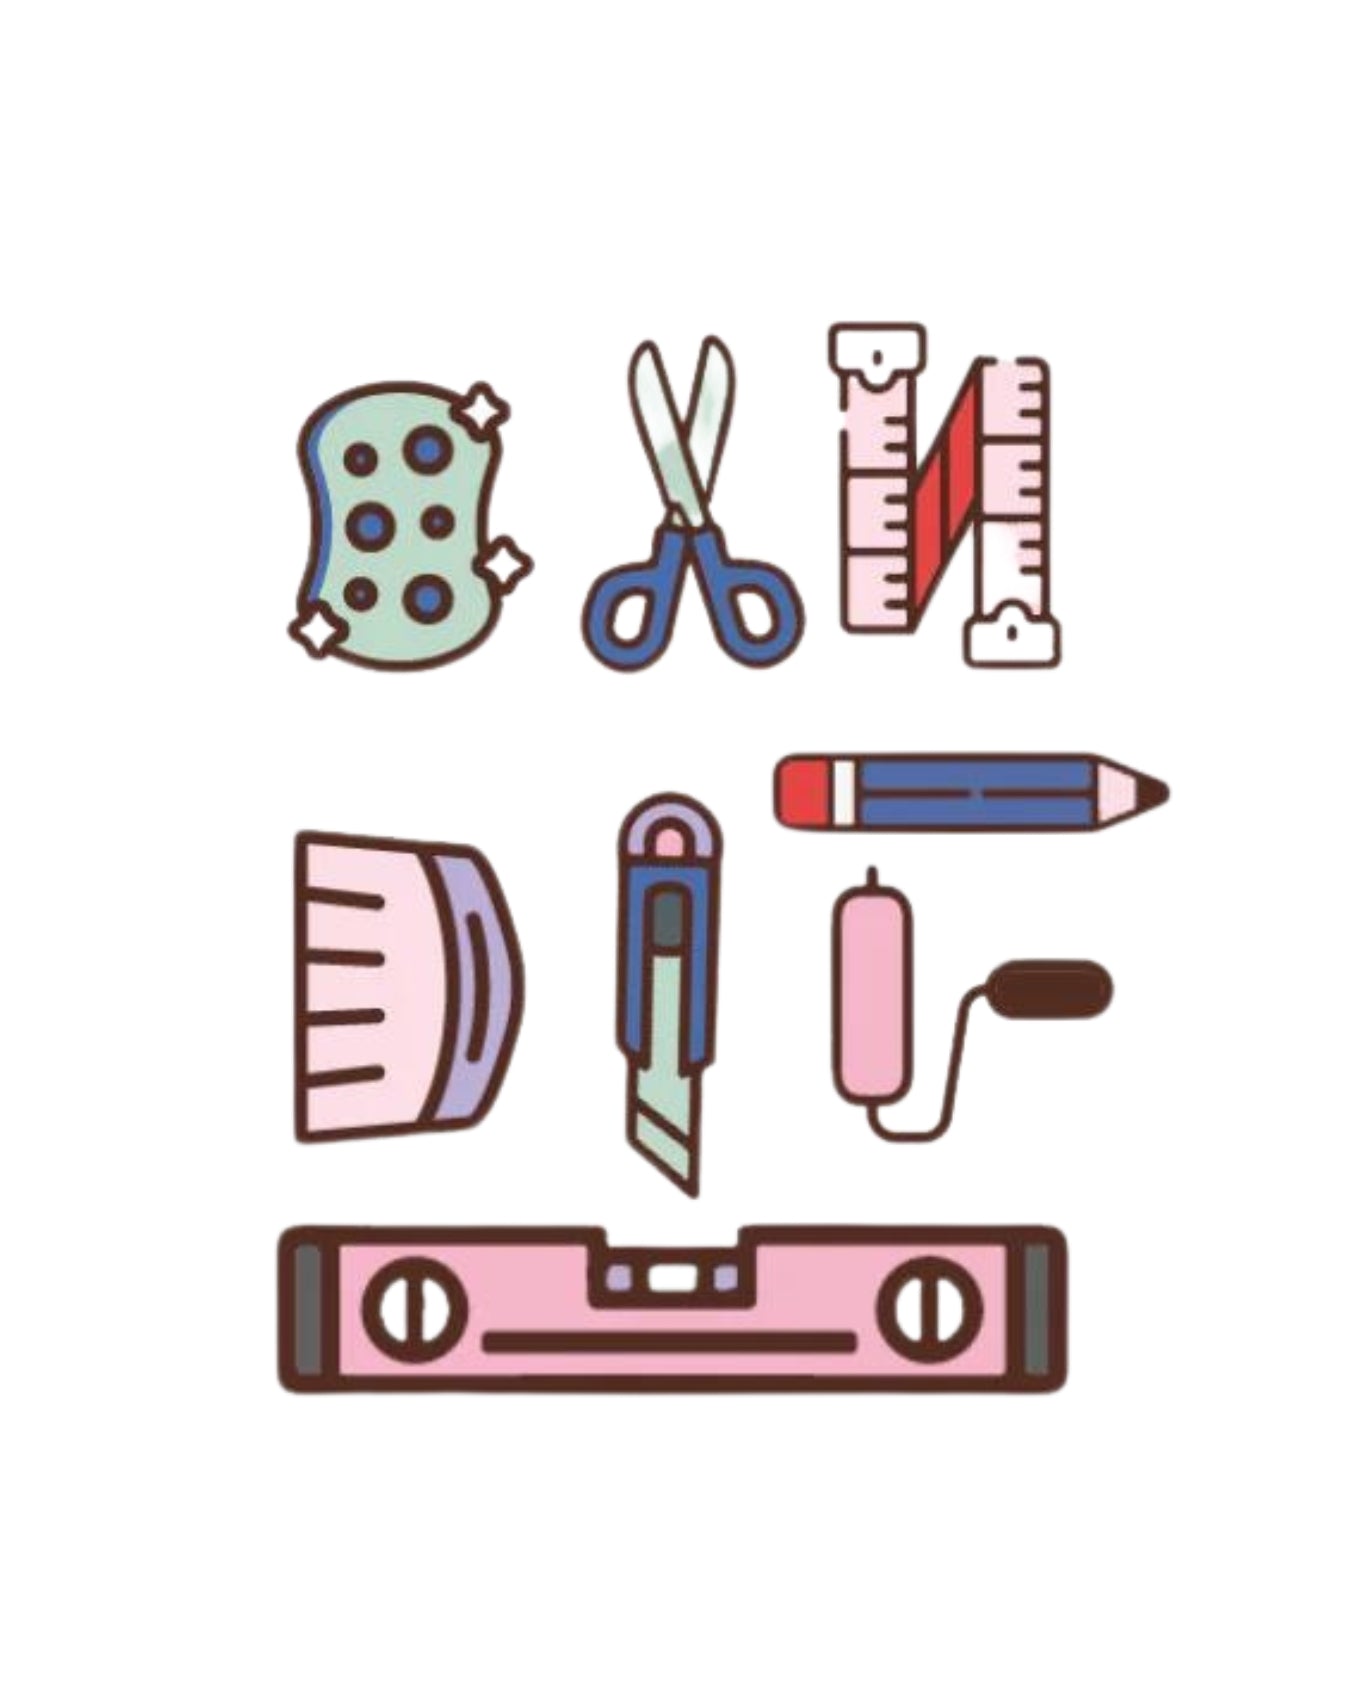
Recommended tools
Rollers and tray | Cube | Brush (for the areas that the roller does not reach, for example, sockets) | Bubble or plumb level (to make sure the wallpaper is rectus) | Steel rule (to make a Straight and clean cut in the upper and lower part) | Sponge for wallpaper (soft or sponge cloth, preferably cellulose) | Pencil | Handmade knife | Brush tool to wallpaper.
Get to work!
Next we explain how to install our murals Non Woven, Metallic and Vinyl.
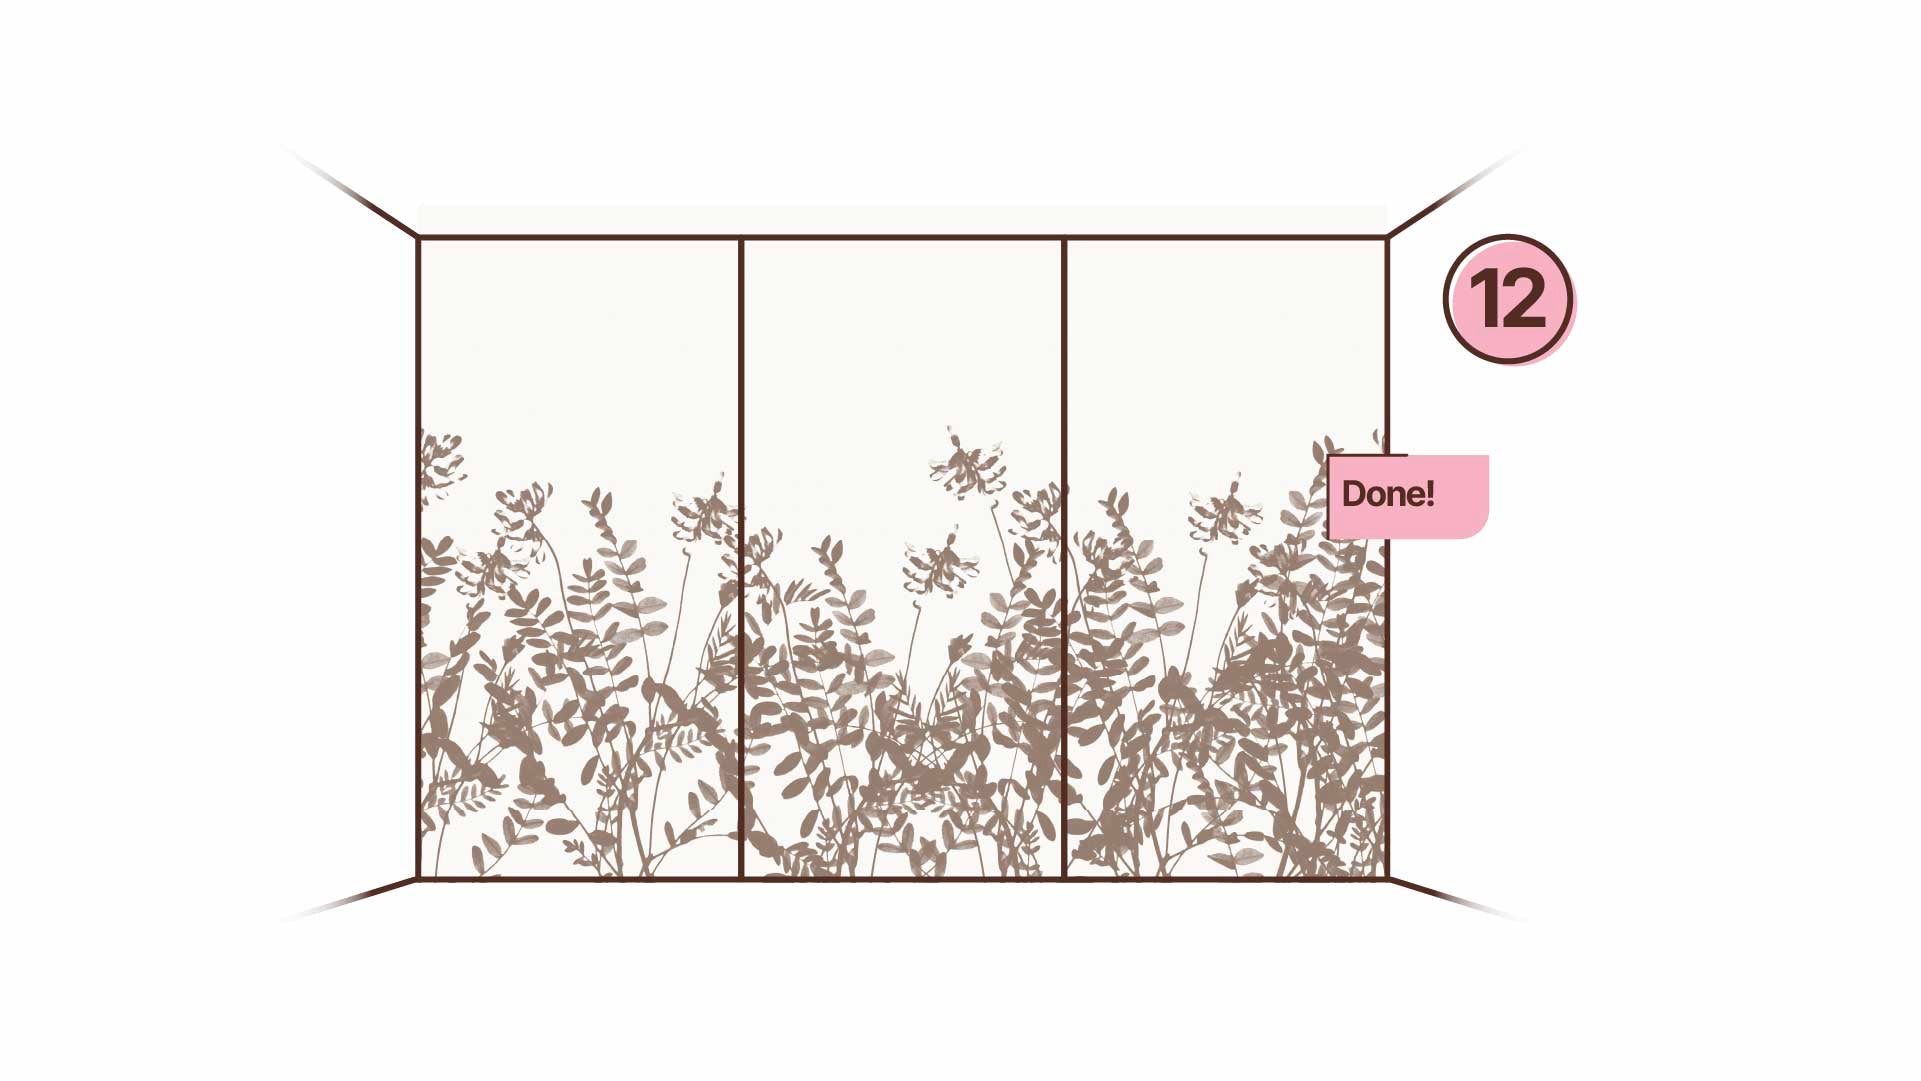
Begins by dividing paper strips as indicated by the cutting symbols. Place the paper strips, with the Up -label, in numerical order Starting with the strip number 1. Be sure to have all the paper strips and that none of them is defective or damaged.
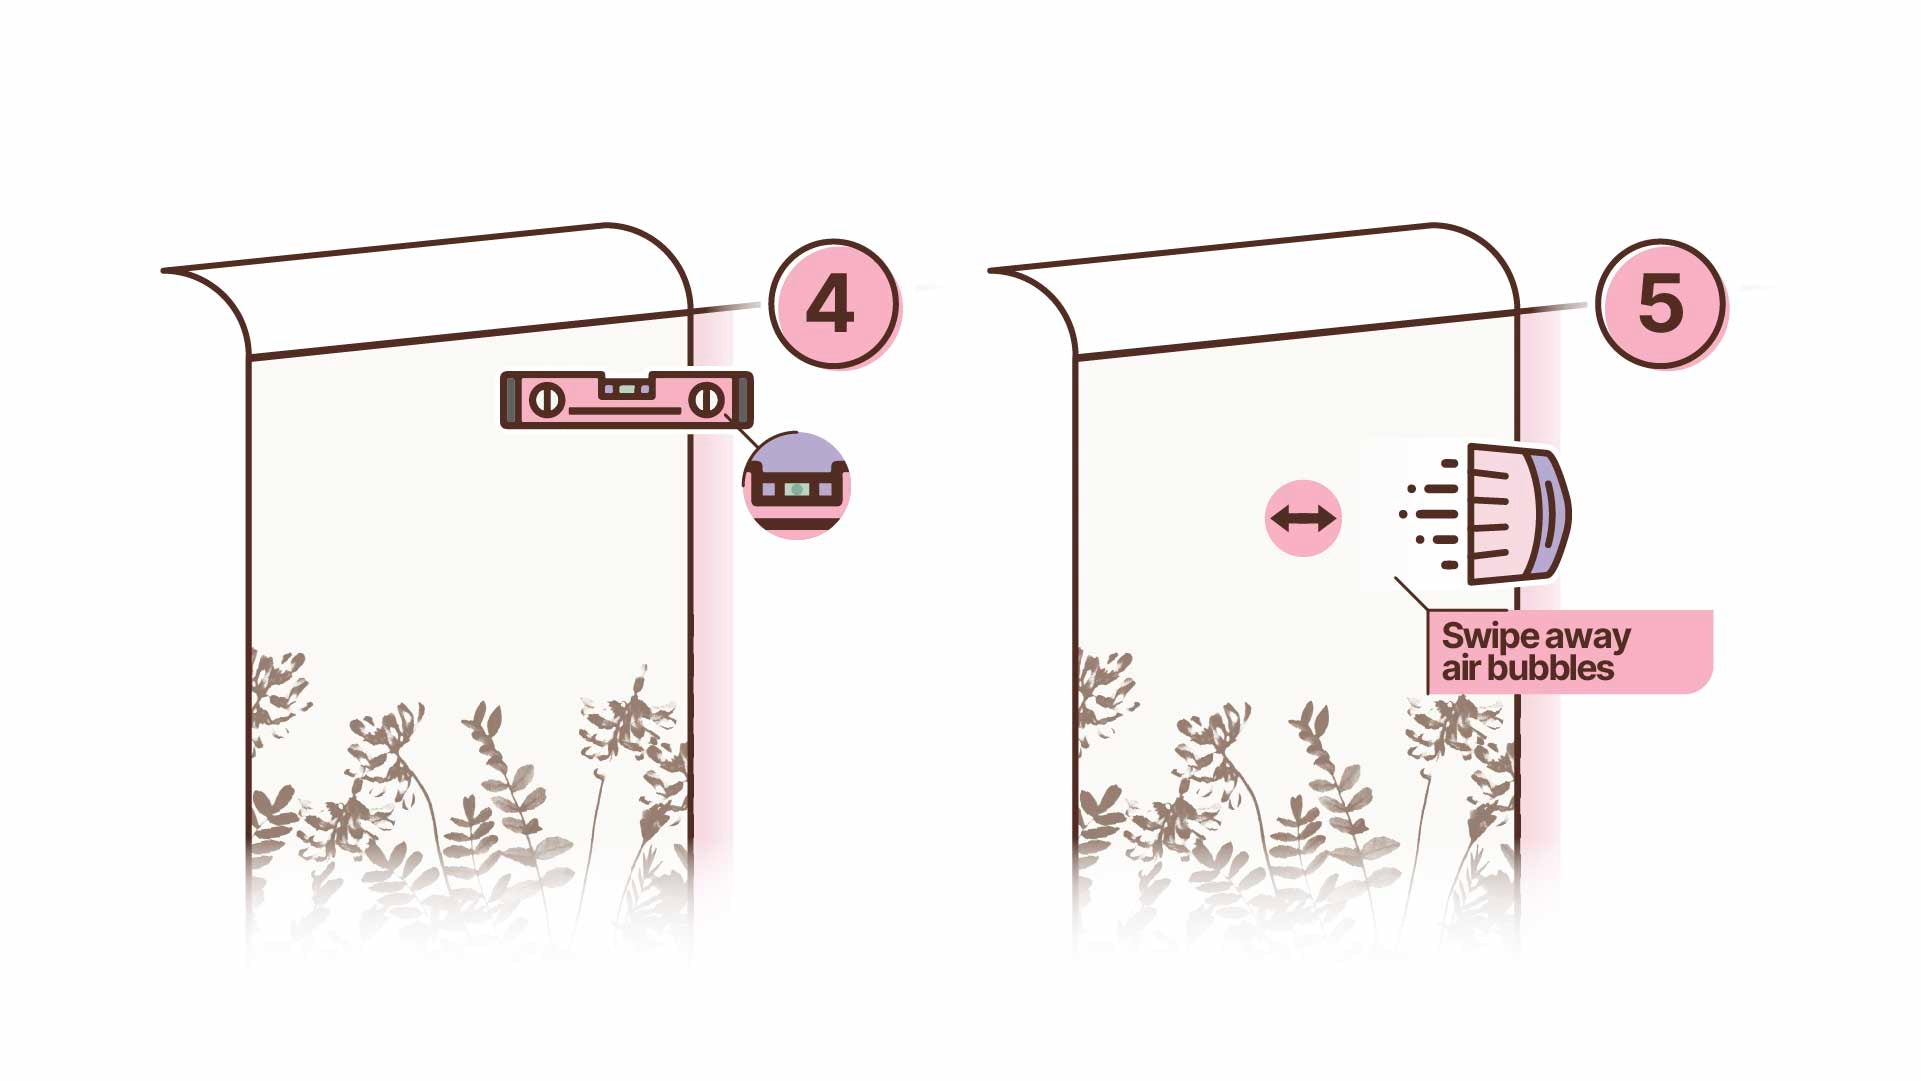
Our murals are always placed on Left to right, begins with the left corner of its wall. The paper strips are numbered In order to place them from left to right. Paper strips should be placed edge by edge Without overlapping. It is essential that first paper pull is placed vertically straight. (Tip: Create a pencil brand that indicates the width of a wallpaper from the left near the ceiling. Use a plumb In the brand and draw a vertical line on the wall. Then, align the first paper strip with the pencil line).

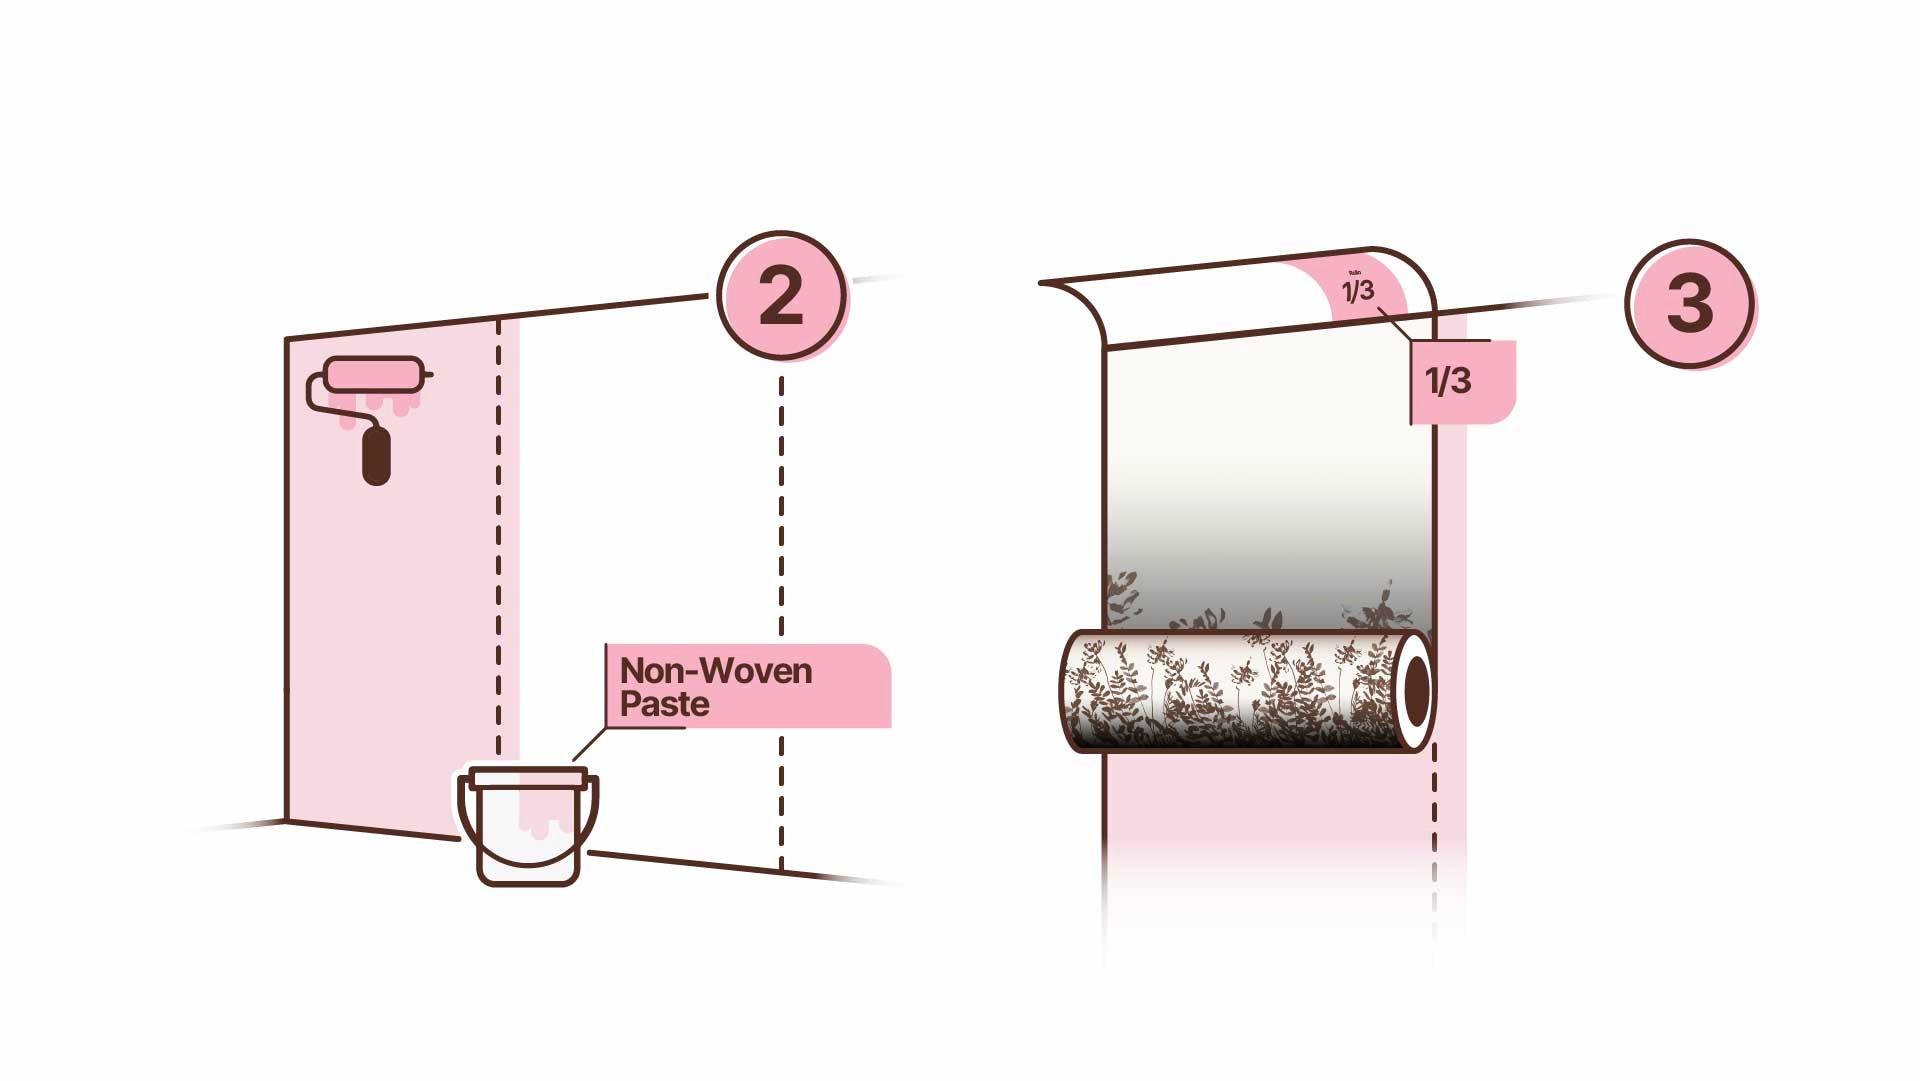
Place the line of paste directly On the wall. Be sure to uniformly cover the entire surface. If you leave an area without a tail, the wall mural will bubble. Paste an area of the width of a paper and a half strip at the same time. Press soft and evenly The strip to make sure there is no visible seams. Make sure they stick on the wall in the area where the strips coincide so that the edges are not visible.
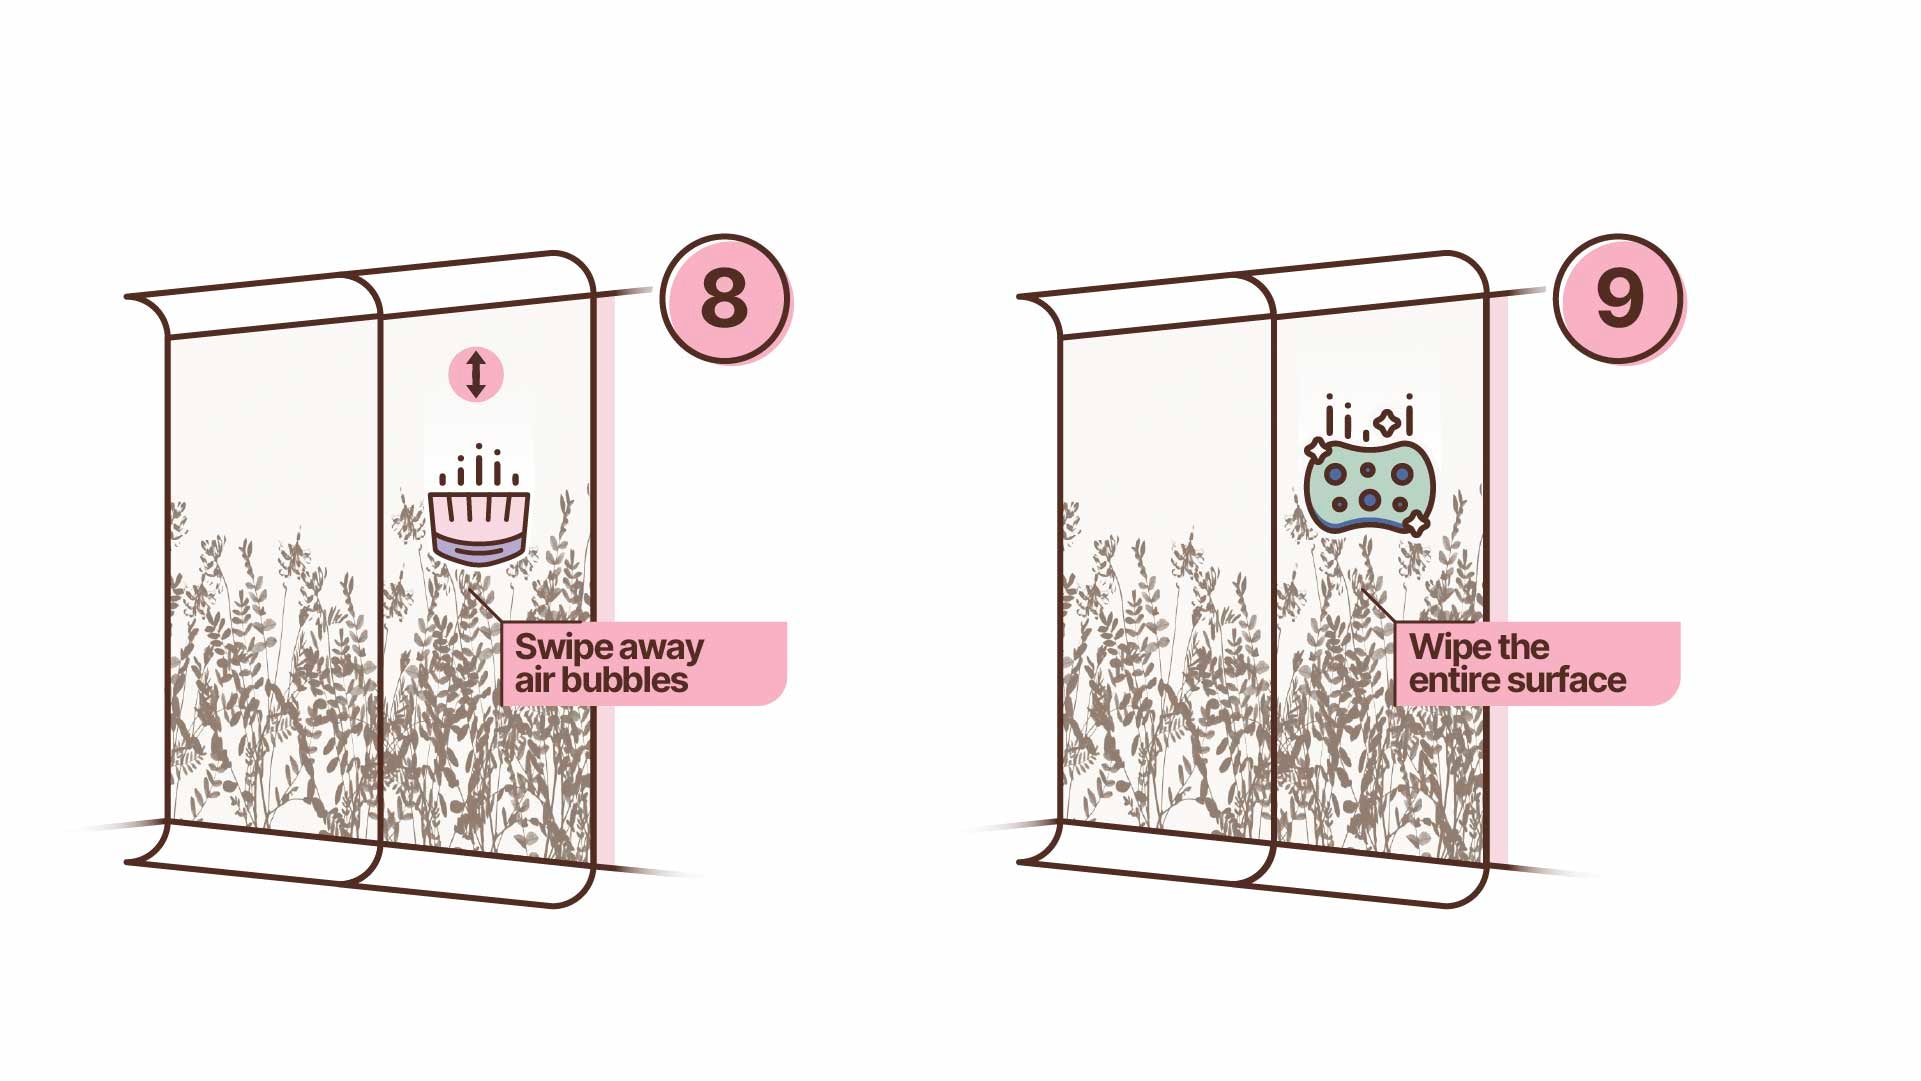
Try not to put the tail of paste in the front of the mural. Any excess tail must be removed immediately with A wet sponge For wall paper. Alisa each length with a wallpaper tool clean or a brush of wall paper. Work from the roof to the ground and from the center to the edges.

Repeat steps from 2 to 9 and carefully cut the leftover edges to adjust your wallpaper well.
Try not to put the tail of paste in the front of the mural. Any excess tail must be removed immediately with a Wet sponge For wall paper. Alisa each length with a clean wallpaper tool or a wall paper brush. Work from the roof to the ground and from the center to the edges.
Begins by dividing paper strips as indicated by the cutting symbols. Place the paper strips, with the Up -label, in numerical order Starting with the strip number 1. Be sure to have all the paper strips and that none of them is defective or damaged.
Our murals are always placed on Left to right, begins with the left corner of its wall. The paper strips are numbered In order to place them from left to right. Paper strips should be placed edge by edge Without overlapping. It is essential that first paper pull is placed vertically straight. (Tip: Create a pencil brand that indicates the width of a wallpaper from the left near the ceiling. Use a plumb In the brand and draw a vertical line on the wall. Then, align the first paper strip with the pencil line).
Place the line of paste directly On the wall. Be sure to uniformly cover the entire surface. If you leave an area without a tail, the wall mural will bubble. Paste an area of the width of a paper and a half strip at the same time. Press soft and evenly The strip to make sure there is no visible seams. Make sure they stick on the wall in the area where the strips coincide so that the edges are not visible.
Try not to put the tail of paste in the front of the mural. Any excess tail must be removed immediately with A wet sponge For wall paper. Alisa each length with a wallpaper tool clean or a brush of wall paper. Work from the roof to the ground and from the center to the edges.
Repeat steps from 2 to 9 and carefully cut the leftover edges to adjust your wallpaper well.
Try not to put the tail of paste in the front of the mural. Any excess tail must be removed immediately with a Wet sponge For wall paper. Alisa each length with a clean wallpaper tool or a wall paper brush. Work from the roof to the ground and from the center to the edges.
How to install our Peel & Stick murals?
Simple installation and uninstall rolls wallpaper Matchwalls Peel and Stick to change your walls in an eye opening and closing easily and very easily.
Previous recommendations
Before choosing Peel & Stick dedicates 1 minute to reviewing these recommendations to be sure to use the Peel & Stick solution.
Wall status
Check your wall and surfaces, avoiding chipped, rough wall. If the wall is not smooth or has imperfections, roughness or grains recommend you to wallpaper with quality non woven, vinyl or conventional metallics of installation and wall in the wall.
Paint
Before installing or choosing the quality Peel & Stick verifies that your wall was painted in 30 days before and is totally dry.
We recommend that if the wall is painted and now you are going to paint the color of the wall, it is similar to the color chosen in your design, avoid installing your paper matchwallspeel & stick white background on a dark wall.
Recommended tools
- Bubble or plumb level (to make sure the wallpaper is rectus)
- Steel rule (to make a straight and clean cut at the top and lower part)
- Pencil
- Blade
- Rubber or rigid brushes.
Get to work!
Next we explain how to install our Peel & Stick murals step by step.
Prepare your wall and divide the lengths of your paper roll Matchwalls Peel & Sitck.
- Use a Wet or sponge cloth To clean the wall with warm water or soap.
- Leaves Dry the wall a minimum 24h00.
- Divide the Sections as indicated by cutting symbols of your roll.
- Place the strips you have cut with the Tag up starting with the number one section.
- Leave the strips in Horizontal position for at least 24 hours to climb in the same room in which they will be installed
- Make sure you have All wallpaper strips (lengths) and that none is defective or damaged.
Paste your self -adhesive roll Peel & Stick on the wall.
- Wallpaper Left to right To hang them and the sections must be hung edge with an edge without overlapping.
- The first section must be vertically straight and level With a plumb. Make a slight brand with a pencil to a width of wallpaper from the left, near the ceiling. Hold a plumb on the brand and draw a faint vertical line along the wall. Align the first piece of wallpaper with the paper line.
- Hang the second strip. Press the strips gently and evenly so that the joints are not seen. Alisa each strip with the felt scratch, brush or soft rag and works from the roof to the ground and from the center to the edges.
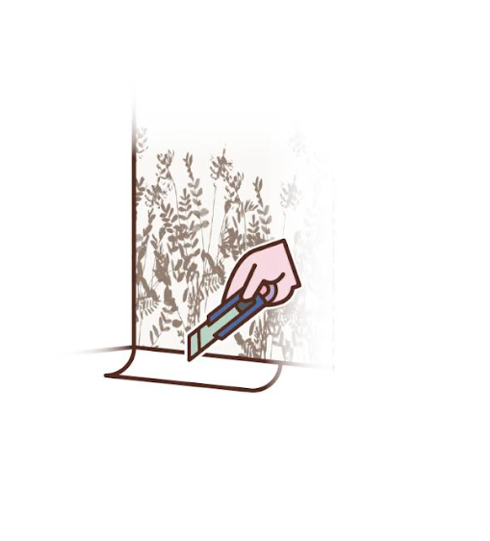
Cut excess paper
- Once all the wallpaper, Cut the leftover along the roof and the floor.
- Always use An sharp blade Not to break the paper.
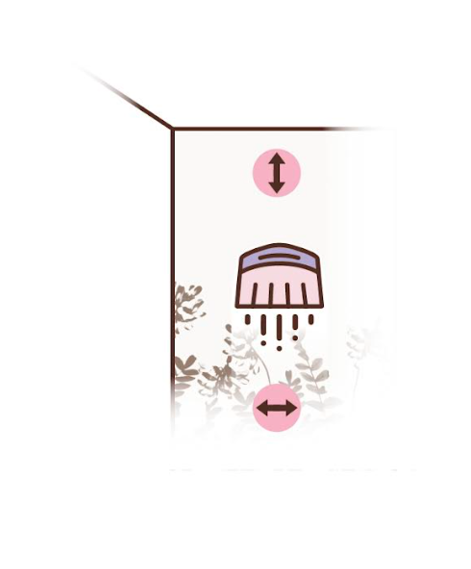
Use rubber or rigid brush.
Finally, when you have placed panels or paper strips on the wall, use the rubber brush with enough pressure and eliminates all possible air Between the panel and the wall. This is an important step for wallpaper to adhere to the wall
Installed
So you can decorate your home and create your own interior design Easy, simple and simple.
Prepare your wall and divide the lengths of your paper roll Matchwalls Peel & Sitck.
- Use a Wet or sponge cloth To clean the wall with warm water or soap.
- Leaves Dry the wall a minimum 24h00.
- Divide the Sections as indicated by cutting symbols of your roll.
- Place the strips you have cut with the Tag up starting with the number one section.
- Leave the strips in Horizontal position for at least 24 hours to climb in the same room in which they will be installed
- Make sure you have All wallpaper strips (lengths) and that none is defective or damaged.
Paste your self -adhesive roll Peel & Stick on the wall.
- Wallpaper Left to right To hang them and the sections must be hung edge with an edge without overlapping.
- The first section must be vertically straight and level With a plumb. Make a slight brand with a pencil to a width of wallpaper from the left, near the ceiling. Hold a plumb on the brand and draw a faint vertical line along the wall. Align the first piece of wallpaper with the paper line.
- Hang the second strip. Press the strips gently and evenly so that the joints are not seen. Alisa each strip with the felt scratch, brush or soft rag and works from the roof to the ground and from the center to the edges.
Cut excess paper
- Once all the wallpaper, Cut the leftover along the roof and the floor.
- Always use An sharp blade Not to break the paper.
Use rubber or rigid brush.
Finally, when you have placed panels or paper strips on the wall, use the rubber brush with enough pressure and eliminates all possible air Between the panel and the wall. This is an important step for wallpaper to adhere to the wall
Installed
So you can decorate your home and create your own interior design Easy, simple and simple.
Do you want to receive signs from our finishes?
Remember that samples A4 that are requested in Peel & Stick quality will be sent and that to assess its design and colors exactly the same.
Receive your order in a maximum of 10 working days
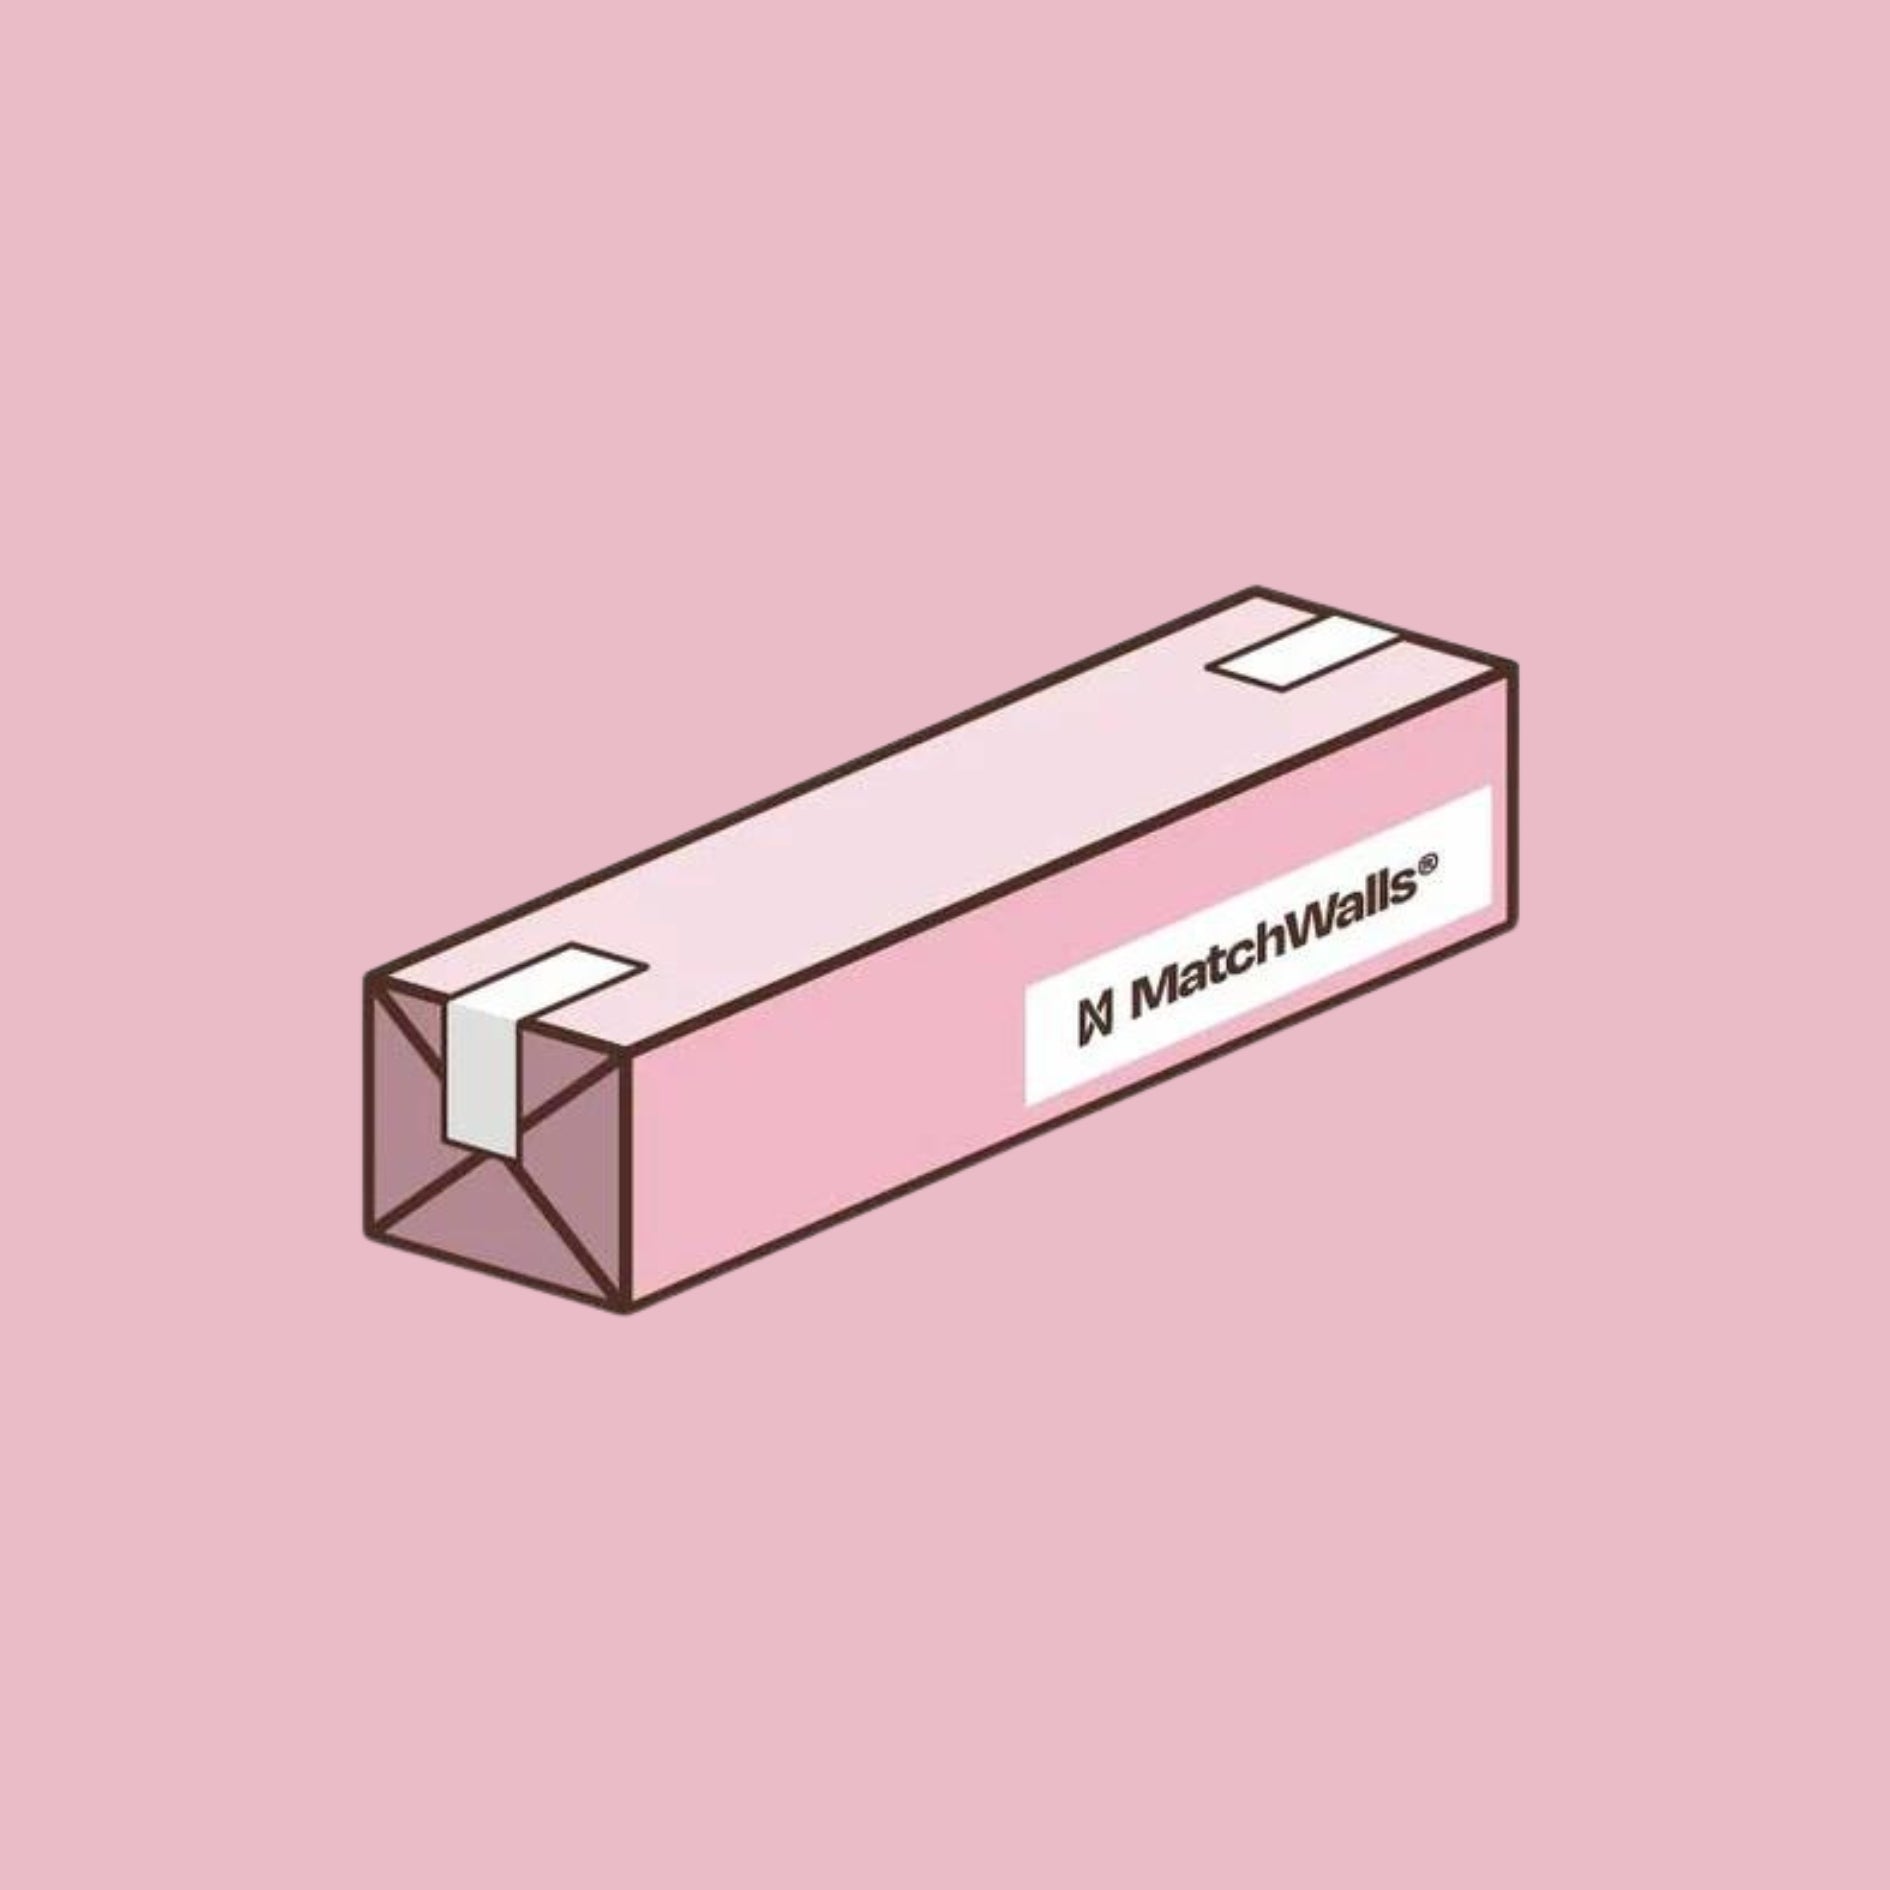
The wallpaper is carefully packed in a resistant recycled cardboard box, which guarantees its safe transport. Is manufactured in a Term to 4 days and once the quality and packaging control is done we send In 5-7 days working with free shipping costs included. You can request an express shipment if you need the paper quickly. Inside the box, you will find the wallpaper, detailed installation instructions and everything you need to know for a perfect installation.
Do you want to create your own design? Imagine your space with your own design
Send us your image and we will help you without obligation. Send us an email designservices@matchwalls.com And we will advise you.
Frequent questions
Murals
What amount of wallpaper Matchwalls do I need?
Our wallpapers They are printed on demand, That is, we manufacture within 4 days once we receive your order. according to the dimensions of its wall. It measures the width and high of your wall and adds from 6 to 10 cm or (2.5 to 6 inches) to these measures for the place of placement and Avoid the lack of paper Or error when making the cuts, it will also help you leave a perfect finish. Then select your design and add the measures to ours m2 calculator or rolls. In most cases, you may need to cut the image to fit the wall proportions, but you can select and adjust the mural part that interests you most, you can also contact us to make design or changes on our designs If you wish, eliminate a reason or change the scale of your choice. If you consider creating a wallpaper design of more than 600 (240 inches) centimeters wide or 350 (140 inches) centimeters high, we recommend that you get in touch with us before making the order to make sure that quality The image is suitable for expansion and being able to do a perfect job and that meets the expectations you expect from Matchwalls and your high quality wallpaper.
What price does the paper or personalized mural painting?
The price of wallpaper varies depending on the type of paper you choose, Roll non -customizable wallpaper of 50 cm measures (0.20 inches) wide by 10 m (393.70 inches) long for sale per unit.
To get your exact price you must choose the type of product and the quality you need in addition to introducing the dimensions of your walls In the roll calculator or simulator of murals. Our prices are based on Unit or Roll and M2 or Inches2 in the case of customizable murals.
What measures have roll strips?
Our wallpaper Roll and mural is printed on both products in coils and panels or strips of 50 cm (0.20 inches). For the rolls they are 10 m ((393.70 inches), Non Woven, vinyl, metallics or Peel & Sitck.
For example, if you make an order of 320 cm (125.98 inches) wide you will receive 7 panels and in a majority of cases the last panel will appear especially to the measures you need and leaving the part of the remaining panel blank or without impression.
How do you get packaged and do I receive in my delivery?
Your paper wallpaper or personalized mural will be delivered to a Box of dimensions 50 cm x 15 cm x 15 cm (0.20 inches x 5.9 inches x 5. 9 inches) and each roll will be perfectly protected, reviewed in a hard cardboard box and includes technical details and installation instructions. Depending The size of your order You can receive 1 box or several boxes that contain a roll each to complete your order and needs
How to measure types of walls and ceilings?
To start, it measures the total length and height of your wall. It is important that you add 10 cm (equivalent to 3 inches) to each of these measures, both in length and in height. This is because we manufacture the wallpaper mural (Roll Non -customizable standard measure) to the exact measurement based on the specifications you provide us when making your order. If you need help to measure different types of walls, do not hesitate to consult the examples we offer below.
First, take the width and high measures of the wall as a whole. It is crucial to confirm these measures with a second review to ensure their precision. When you place your order, we will manufacture the wallpaper mural (Roll Non -customizable standard measure) by adjusting exactly to the dimensions that proportions. Therefore, it is recommended that you increase by 10 cm (equivalent to 3 inches) both width and high, to guarantee the perfect adjustment.
Inclined walls?
Omits any inclination and takes the measures of the wall at its maximum height and width point. The mural will be created as one piece, reaching your hands in rectangular or square format; The excess due to the slopes will be adjusted at the time of the installation. It is prudent that you increase the dimensions of both height and width by 10 cm (about 3 inches), to ensure an ideal adjustment.
Walls inclined on both upper sides?
It measures the most extensive section of the wall, both in its height and in its width. When installing the final product, which usually has a rectangle or square shape, it will be adjusted by cutting any inclined part of the roll or mural. To ensure a perfect adjustment, it is recommended that you increase width and high measures in 10 cm (approximately 3 inches).
Walls with windows and doors?
Be sure to measure both the length and complete wall of the wall. During installation, the elimination of any impediment will be taken into account. The roll and mural wallpaper is made following the dimensions that you specify when making the purchase, so it is recommended that you add 10 cm (approximately 3 inches) to your measurements of wide and high. This will ensure that the paper and mural wallpaper fits your space perfectly.
Skirts and continuous walls?
Before making your purchase, take the width of each wall individually and add these measurements. As a precaution, it increases 10 cm (about 3 inches) on each side of each wall. Then, it measures the height from the highest point, also adding 10 cm (3 inches) to the latter measure. You do not need to request the mural in separate sections for the different walls.
Walls with stairs?
When measuring the wall height, it takes into account both the highest and lowest point, just as you would do with walls that have inclinations. The same rule applies when calculating the width. During the assembly, the inclined parts will be eliminated. To make sure that everything fits perfectly, we advise you to increase width and height measurements by 10 cm (about 3 inches).
How to measure and wallpaper your roof?
Roll and mural wallpaper has the power to beautify your environment. Incorporating it on the ceiling is an innovative idea that brings a unique touch of personality and color vibration to your space, transforming it into an artistic expression. There is no reason to limit your creative expression to the walls when your roof offers another vast canvas waiting to be explored
Identify space.
To ensure a perfect finish, your roof must be completely smooth. Visible textures under the tapestry paper can cause it to be seen with wrinkles and inequalities. If you find this problem, it is time to sand any irregularity and fill in the imperfections detected. The process ends by ensuring that the roof is impeccably clean, preferably with the help of a detergent, for an optimal result.
Have you reviewed the status of your roof? Consider if there are holes, light facilities or any other detail that could influence the installation of the wallpaper. We strongly recommend that this task be carried out by at least two people. You will see that it is easier and even more fun with a little help. If you decide to start from the left end of the design, your starting point should be the number 1 strip, moving sequentially in ascending order. On the other hand, if you prefer to start on the right side, locate the last strip inside the last roll and start there, then continue in a numeric order inverse to the previous strips.
How can I do to avoid the lack of wallpaper and administer the CMs or inches that may be missing at the top or lower wall?
Not all walls are perfect or straight. When the wallpaper on the wall installs, it is important to make sure that the first strip is balanced vertically with a level or plumb so that the installation of the following shows the perfectly oriented design and according to the wall or space. We always recommend that you leave 6 to 10 cm or (2.5 to 6 inches) both in the upper and lower part so that if the 100% perfect paper has not been leveled, you can miss wallpaper both at the top and in the lower one due to the accumulation of unevenness.
What is the difference between the qualities Non Woven, Vinyl, Metallics or Peel & Stick?
All our qualities are printed on Non Woven material or sustainable non -tissue tissue, Fire certificates, washable, resistant to sunlight and have durability and resistance standards of the highest quality.
Our wallpapers fro walls are designed to give PROFESSIONAL INSTALLATION SOLUTIONS and residential to decorators, architects, interior designers and individuals lovers of decoration and interior design.
Non Woven: The solution for individuals looking for a role of High quality without texture Easy to installation and with fire certifications (ignifuges), audited wasability and volatile and sustainability substances. Designed for private and also public spaces, restaurants, hotels, shops. It is the most traditional option and shows the paper and colors in an excellent way in addition to deepening the design and details about sustainable water printing and matte finish.
Vinyl: particular use material and Professional of Foostipugas and Superior Temphities and Wasability to the quality Non Woven in textured matte finish. Vinyl is a high quality material and finishes capable of expanding the feeling of comfort and sensations of a textured material. Superior Igniphuga Certification, Washability, Volatile Particles In addition to resistance and tolerance to friction or blows. It is a perfect material for the most demanding decorators, interior designers and architects or particular experts lovers of high decoration and details.
Peel & Stick: the Self -adhesive solution for individuals that need a clean, simple installation, just remove the posterior protective sheet and apply it directly on the wall. Peel & Stick helps make a simple installation of your wallpaper or mural. Peel & Stick is a high quality material with ignipugated certifications, wasability, resistance and durability in satin matte finish for professional spaces, shops, hotels and restaurants.
It is a practice option for spaces that need continuous changes of atmosphere, rented and that require simple uninstall.
METALLICS: Wallpaper more sophisticated with finishes in silver, gold and copper For the most demanding spaces. Metallics is the response to the metal designs that need this material. Now with particular and professional metallics they can create authentic golden designs, silver and copper with ignipitous certifications, wasability and durability. It is a material that highlights non -textured metal inks. This material is only available for design that include, silver, gold and copper and is not printed for other design that you have one of the three metal inks, gold, silver or copper.
You can request the technical chips of each of these materials At our Matchwalls customer service and we will be happy to provide you, certifications and technical specifications of both installation and the material for your interior design projects.
Can I ask for a sample of my wallpaper before making the final purchase?
We will be happy to help you select your ideal roll paper. You can request a A Sample A4 through our option "Request a sample", so you can assess colors, design, texture and paper quality. The samples are sent by ordinary mail and you will receive them in your mailbox. If you need a 50 cm x 50 cm sample (0.20 inches x 0.20 inches) or upper strips we can help you and please recommend that you contact our customer service department, we will be happy to advise you and manufacture your samples with your personalized design or Our collections for your professional or residential interior design project.
Can I ask for my own roll paper design?
Yes, you can request samples from Your own design of roll or mural wallpaper. Contact our customer service team, send us your file and design in JPG format, JPEG with a minimum of 150 dpi, chosen paper quality, wall size and we will advise you to develop both your design paper wallpaper, in addition to your Manufacture your sample that we will send by ordinary postal or standard or urgent service.
How do I choose the best wallpaper design matchwalls for my residential or professional space?
You can inspire and look for references in our social networks, Tik tok, Instagram, Pinterest, LinkedIn or YouTube, In addition to our magazine of inspiration. Value the patterns and designs and choose the reason, color and material finish that best suits your interior design and look & Feel that you want to transmit in your room, living room, store, hotel or restaurant. Factors such as space size, angles, doors, windows are very important to create a space.
Transmit your style and decorate using our wallpapers, you will find solutions to your needs through our collections and design equipment. Do not hesitate to send your space once this finish to our social and press team so that we publish your projects and we can share together your Matchwalls experience.
Is the surface on which I am going to install my paper wallpaper important?
Do not apply the roll paper on rough walls and verify that the wall is always dry, level and clean. It is recommended Clean the wall with the aim of preparing it and avoiding the porosity of absorbent, porous or conglomerate surfaces. You cannot install paper on metal walls, crystals or synthetic wood laminates, it is advisable to prepare and check the wall before installing so that the papers that are installed with wall tail are well fixed and with a homogeneous and quality appearance.
Can I install my paper paper on a wall wall?
We always have to uninstall the paper of the wall and clean the wall avoiding roughness and leaving the wall Smooth and undulating possible to achieve an optimal result.
You will need a cube with warm water, a rag or sponge and a wallpaper dart. Look for the joint, lift the paper gently and moisten all the wallpaper. Subsequently, cuts are made on the wallpaper that help to tear the wallpaper and stretch with softness after a few minutes with the help of the scraper.
Can I install wallpaper in wet areas or kitchens?
You can install our wallpapers in wet areas or kitchens as long as the paper Do not have direct contact with cold or hot liquids and there is a prudential distance of direct contact. Our wallpapers have washing and fire certifications so that they can be washed following the instructions of use guides that you can ask our customer service equipment.
A advice that works very well: "Print a latex layer (sale in any specialized decoration or DIY center) on your wallpaper once installed ”and protects with a film of transparent material both your paper and joints and so you can increase or resistance to environmental humidity or spots that may occur In your kitchen.
Any of our qualities can be installed in these spaces, but if you have to choose one we will recommend the vinyl quality that is the one that highlights the highest wasability performance has.
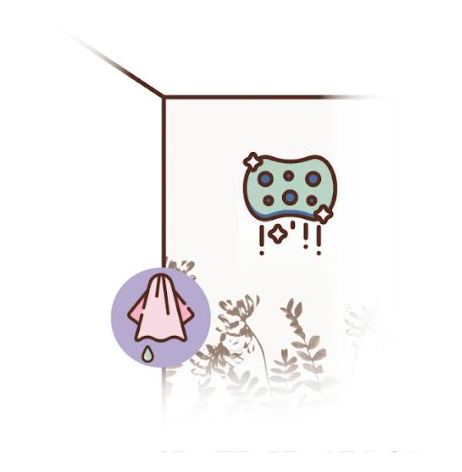
How can I clean my wallpaper?
It is very easy, You can use a simple cloth or sponge, clean and introduce neutral detergent and gently rub the dirt of possible spots.
Can you perform roll paper facilities?
We would love to be able to send you an installer, but Matchwalls sells internationally and it is not possible to recommend a local installer, But if we will be delighted that you follow our recommendations and request our installation guides, we will also be happy to help you for any questions if you contact our customer service.